How to Change a Drive Belt on a Snowmobile: Quick & Easy Guide
If your snowmobile isn’t running as smoothly as it should, the drive belt might be the problem. Knowing how to change a drive belt on a snowmobile can save you time, money, and frustration.
Imagine hitting the trails again without delay, feeling the power return beneath you. In this guide, you’ll find simple, step-by-step instructions to replace your drive belt quickly and safely. Keep reading, and you’ll be back on the snow in no time.
Signs Of A Worn Drive Belt
A worn drive belt may show cracks, fraying, or glazing on its surface. It can also slip or make unusual noises during operation. Noticing these signs early helps prevent breakdowns while riding your snowmobile.
Identifying the signs of a worn drive belt on your snowmobile can save you from unexpected breakdowns during your thrilling rides. A drive belt in poor condition not only affects performance but can also cause further damage to your machine. Knowing the symptoms of wear can help you change it in time and keep your snowmobile running smoothly.Visual Damage
Start by giving your drive belt a thorough inspection. Look for cracks, fraying, or missing chunks on the belt’s surface. These are clear indicators that it’s time for a replacement. Pay attention to the belt’s edges. If they appear glazed or shiny, this could mean the belt has been overheating. This is often a result of slippage or improper tension.Performance Issues
Notice any changes in your snowmobile’s performance? A worn drive belt often leads to sluggish acceleration and reduced speed. You might find that your snowmobile isn’t as responsive as it used to be. Listen to your machine. Unusual noises, like squealing or grinding, can also signal a worn belt. If you hear these sounds, it might be time to inspect the belt closely. Have you ever experienced a belt snapping mid-ride? It’s not only frustrating but can also be dangerous. Regular checks can prevent such occurrences. By staying vigilant and proactive, you can ensure your snowmobile remains in top condition, ready to take on snowy adventures whenever you are.Tools Needed For Replacement
Changing a drive belt on your snowmobile requires having the right tools at hand. Without them, the task can become frustrating and time-consuming. Gathering these essential items beforehand will make the process smoother and safer, saving you from unexpected delays.
Basic Hand Tools
To replace the drive belt, you’ll need several common hand tools. A set of wrenches and sockets will help you remove bolts holding the belt cover and clutch in place.
- Socket wrench set:Various sizes, typically 10mm to 17mm sockets are useful.
- Combination wrenches:For bolts that are harder to reach with a socket wrench.
- Screwdrivers:Both flathead and Phillips, for prying or removing screws.
- Torque wrench:To tighten bolts to the manufacturer’s recommended specifications.
- Pry bar or belt removal tool:Helpful for easing the old belt off the pulleys.
I once tried to replace my snowmobile belt without a torque wrench and ended up over-tightening a bolt, which caused damage later. Tools are not just for convenience—they protect your machine.
Safety Gear
Safety should never be an afterthought. Wearing the right gear protects you from injuries during the replacement process.
- Gloves:Protect your hands from sharp edges and provide a better grip.
- Safety glasses:Prevent debris or dust from getting into your eyes.
- Closed-toe shoes:Shield your feet if tools or parts accidentally drop.
- Long sleeves:Help avoid scrapes or burns while working close to hot engine parts.
Have you ever underestimated how slippery a belt can be? Wearing gloves not only keeps your hands clean but also helps you maintain control. What safety gear do you always make sure to wear before starting a repair?
Preparing The Snowmobile
Preparing your snowmobile properly is crucial before changing the drive belt. This step ensures safety and easy access to the belt area. Taking time to prepare can prevent accidents and make the process smoother.
Park On A Flat Surface
Find a flat and stable area to park your snowmobile. This stops it from moving or tipping during the work. A flat surface helps keep the snowmobile steady and safe.
Use the parking brake to lock the snowmobile in place. Avoid soft ground or slopes that might cause instability. Clear the area around the snowmobile for easy movement.
Disconnect The Battery
Disconnect the battery to avoid electrical shocks or accidental starts. Remove the negative terminal first, then the positive one. This small step protects you while working on the machine.
Keep the battery terminals away from any metal parts. Check the battery is fully disconnected before starting any repairs. This simple action reduces risk and keeps you safe.
Credit: www.dootalk.com
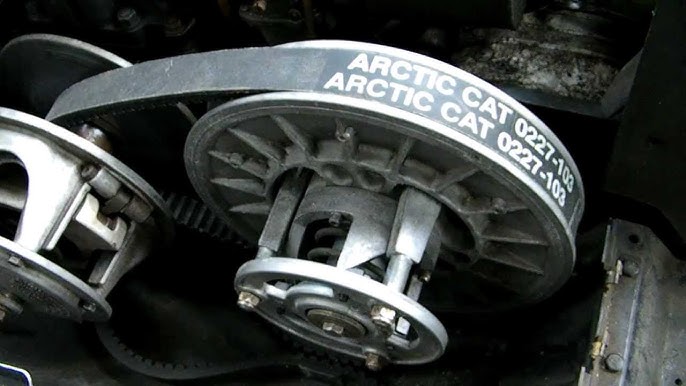
Removing The Old Drive Belt
Removing the old drive belt from your snowmobile is a crucial step that requires patience and attention to detail. You’ll need to carefully access the clutch, release the belt tension, and then take out the belt without damaging any components. Doing this properly ensures a smooth installation of the new belt and prevents future issues on the trail.
Accessing The Clutch
First, you need to get to the clutch, which is usually protected by a cover. Use the right tools to remove the clutch cover bolts; keeping them organized helps avoid losing any parts. Once the cover is off, you’ll have clear access to the drive belt and the clutches.
Keep in mind that some snowmobiles have different clutch designs. If you’ve never opened your clutch before, it might seem tight or stuck. Don’t force it—check your owner’s manual or watch a quick video to see the exact layout of your model.
Releasing Belt Tension
The belt is held tight by the clutch system, so you need to release its tension before you can remove the belt. Locate the tensioner and use a wrench or clutch tool to ease the pressure off the belt. This step requires a bit of strength but take your time to avoid slipping or damaging the clutch.
Ask yourself: Is the tensioner spring worn out or rusty? If yes, now might be a good time to replace it. A faulty tensioner can cause your new belt to wear out faster.
Taking Out The Belt
With the tension released, the belt should slide off the clutch pulleys smoothly. Wiggle it gently if it feels stuck, but don’t force it too hard. Inspect the old belt as you remove it—notice any cracks, fraying, or glazing, which are signs it’s definitely time for a replacement.
Sometimes belts get stuck due to dirt or debris. Use a clean cloth to wipe the pulleys before installing the new belt. A clean surface ensures better grip and longer belt life.
Inspecting Clutch Components
Inspecting the clutch components is a crucial step before changing the drive belt on your snowmobile. These parts endure a lot of stress, and any damage or dirt can reduce performance or even cause failure. Taking time to carefully check and clean these components can save you from unexpected breakdowns on the trail.
Checking For Wear
Start by closely examining the clutch faces for any grooves, glazing, or uneven wear. These signs indicate the clutch is not gripping properly and may need replacement. Also, check the springs and weights inside the clutch for cracks or damage, as worn parts can affect belt tension and shifting.
Have you noticed your snowmobile slipping gears or losing power suddenly? That often points to clutch wear. Don’t just rely on looks—feel the clutch surfaces with your fingers for rough spots or inconsistencies. If something feels off, it’s better to replace the part now rather than later.
Cleaning The Clutch
Dirt, dust, and oil buildup on the clutch can reduce grip and cause the belt to slip. Use a clean, dry cloth or a soft brush to remove debris from the clutch faces and moving parts. Avoid using harsh chemicals that might damage the clutch material.
After cleaning, check the clutch for smooth movement by rotating it by hand. Any sticking or unusual noise might mean internal parts need attention or lubrication. Keeping your clutch clean ensures smoother operation and extends the life of both the belt and the clutch itself.
Credit: finntrail.com
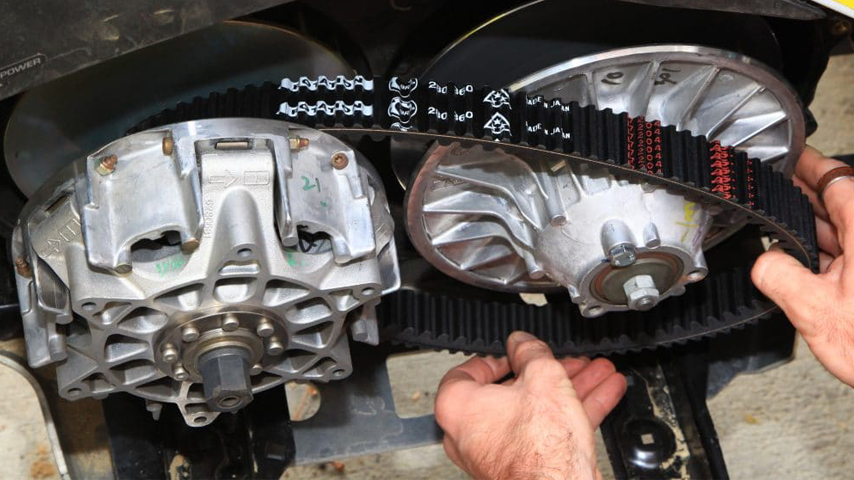
Installing The New Drive Belt
Installing the new drive belt is a crucial step to get your snowmobile back on track. It requires careful handling to ensure the belt fits perfectly and operates smoothly. Taking your time here prevents damage and extends the life of your snowmobile’s transmission system.
Positioning The Belt
Start by placing the new drive belt around the clutch and the driven pulley. Make sure the belt sits evenly in the grooves without twisting or overlapping. A misaligned belt can cause premature wear or even slip off during operation.
Check that the belt’s smooth side contacts the correct surfaces—usually the pulley faces—while the textured side grips the clutch drums. If you feel resistance or the belt doesn’t seem to fit easily, double-check its orientation. A quick test spin of the pulleys can help confirm proper seating.
Adjusting Tension
Correct tension is key to optimal performance. Too tight, and the belt will strain the engine and pulleys; too loose, and it will slip, reducing power delivery. You want just enough tension so the belt stays in place without excessive stress.
To adjust tension, use the tensioner bolts or sliders on your snowmobile’s drive system. Gradually tighten or loosen while rotating the belt by hand to feel for proper resistance. If your manual provides a tension measurement, use a ruler or tension gauge to verify.
Have you ever noticed unusual noises or slipping during a ride? Often, improper belt tension is the cause. Paying close attention here saves you from those frustrating moments on the trail.
Testing The Installation
Testing the installation of your new drive belt is essential. This step ensures the belt fits well and the snowmobile runs smoothly. Proper testing helps avoid future breakdowns and keeps your ride safe. Take time to carefully check the belt’s performance before hitting the trails.
Starting The Snowmobile
Start the engine and let it idle. Watch the belt and pulleys closely. Make sure the belt moves without slipping or jumping. If the belt feels loose or tight, adjust the tension as needed. Keep the engine running for a few minutes to warm up the system.
Listening For Unusual Noises
Listen carefully for any strange sounds. Squeaking, grinding, or rattling may indicate a problem. These noises could mean the belt is not aligned or is worn out. Stop the engine immediately if you hear anything unusual. Inspect the belt and pulley system for any issues.
Test Ride Tips
Take a short ride to test the belt under load. Start slow and increase speed gradually. Pay attention to how the snowmobile accelerates and handles. If you feel slipping or loss of power, check the belt tension again. Avoid rough terrain until you are sure the belt is secure.
Maintenance Tips For Drive Belts
Keeping your snowmobile’s drive belt in top shape is key to smooth rides and avoiding unexpected breakdowns. Simple maintenance habits can extend the belt’s life and save you time and money. Let’s look at some practical tips you can apply right away to protect your drive belt.
Regular Inspections
Checking your drive belt often helps catch wear before it becomes a problem. Look for cracks, fraying, or glazing on the belt surface. Even small signs of damage can affect performance and lead to belt failure.
Run your fingers along the belt to feel for uneven spots or rough patches. Also, check the tension—too loose or too tight can cause slipping or excessive wear. How often do you inspect your belt? Making it part of your routine can prevent costly repairs.
Proper Storage
How you store your snowmobile off-season affects the drive belt’s condition. Keep the machine in a cool, dry place away from direct sunlight to prevent the belt from drying out and cracking. Avoid areas with high humidity or temperature swings.
If you’re storing the snowmobile for months, consider removing the belt to reduce stress. Store it flat or hanging loosely, never folded or bent sharply. This small step can keep the belt flexible and ready for the next ride.
Avoiding Overheating
Overheating is a common cause of drive belt damage. Riding in deep snow or climbing steep hills can push the belt beyond its limits. Pay attention to unusual smells or smoke—these are warning signs that the belt is overheating.
Give your snowmobile breaks during intense use to cool down the belt. You might be tempted to push hard, but is it worth risking a belt failure miles from help? Smart riding protects your belt and keeps your adventures going.
Credit: www.arcticchat.com
Frequently Asked Questions
How Often Should I Change My Snowmobile Drive Belt?
Change your snowmobile drive belt every 1,500 to 2,000 miles. Inspect it regularly for cracks or wear. Replace sooner if you notice damage or slipping to ensure optimal performance and safety.
What Tools Do I Need To Change A Snowmobile Drive Belt?
You need a socket wrench, screwdrivers, and a belt removal tool. Some models require a torque wrench for proper belt tension. Always check your snowmobile’s manual for specific tool requirements.
Can I Reuse An Old Snowmobile Drive Belt?
No, reusing an old drive belt is not recommended. Worn belts lose tension and grip, causing poor performance. Always replace with a new belt to maintain efficiency and prevent breakdowns.
How Do I Know If My Snowmobile Drive Belt Is Worn?
Look for cracks, fraying, or glazing on the belt surface. If your snowmobile slips or loses power, the belt might be worn. Regular visual checks help catch issues early and avoid damage.
Conclusion
Changing a drive belt on your snowmobile keeps it running smoothly. Follow each step carefully and take your time. Use the right tools and check the belt’s fit before finishing. Regular checks help avoid surprises during rides. This simple task saves money and boosts safety.
Your snowmobile will thank you with better performance. Keep practicing to gain confidence and skill. Ready for your next snow adventure?

Automotive Specialist & Expert Writer
Tyler Kingston is a passionate automotive writer with a wealth of knowledge in all things cars. With years of experience in the automotive industry, Tyler specializes in everything from vehicle maintenance to the latest car technologies and innovations. He is known for his ability to break down complex automotive concepts into easily digestible, engaging content for both novice and experienced car enthusiasts. Whether it’s detailing car repair techniques, reviewing new car models, or diving into the world of auto accessories, Tyler’s articles provide valuable insights to readers. His hands-on experience, combined with a genuine love for cars, allows him to deliver expert advice, tips, and news that keeps readers coming back for more.