How to Test Snowmobile Stator: Easy Steps for Accurate Diagnosis
If your snowmobile is acting up or not charging properly, the stator might be the problem. Knowing how to test your snowmobile stator can save you time, money, and frustration.
You’ll discover simple, step-by-step ways to check if your stator is working right. By the end, you’ll feel confident tackling this crucial part and getting your snowmobile back on track. Ready to learn how to avoid costly repairs and keep your ride running smoothly?
Let’s dive in.
Signs Of A Faulty Stator
Recognizing the signs of a faulty stator is essential for snowmobile enthusiasts. A malfunctioning stator can cause numerous issues, impacting your ride’s performance. Understanding these signs allows timely interventions to keep your snowmobile running smoothly.
Common Symptoms
Several symptoms indicate a faulty stator. Here are some common ones:
- Difficulty starting the engine.
- Flickering or dim headlights.
- Sudden battery drain.
- Inconsistent engine performance.
These symptoms can disrupt your snowmobiling experience. Addressing them early helps maintain your vehicle’s efficiency.
Impact On Snowmobile Performance
A faulty stator significantly affects performance. It can lead to poor engine response, reducing the thrill of your ride. This issue can also cause frequent breakdowns, leaving you stranded. Proper maintenance and timely repairs ensure optimal performance.
Tools Needed For Testing
Testing your snowmobile stator requires the right tools to get accurate results and avoid guesswork. Having these tools on hand not only saves time but also helps you pinpoint issues quickly. Let’s look at what equipment you need to make your testing straightforward and effective.
Multimeter Essentials
A reliable multimeter is the heart of stator testing. You need one that can measure resistance (ohms), voltage, and continuity. Digital multimeters are preferred because they provide clear readings and are easier to use compared to analog ones.
Look for a multimeter with:
- Auto-ranging capabilityto simplify reading different values.
- Backlit displayto work comfortably in low light, such as a garage or shed.
- Durable probeswith sharp tips for making good contact with stator terminals.
Have you ever struggled with unclear readings or weak probe contacts? Investing in a quality multimeter solves these common frustrations, making your testing smoother and more reliable.
Additional Equipment
Besides the multimeter, a few extra tools can make your job easier and more efficient. Start with a basic set of screwdrivers and wrenches to access the stator and remove necessary covers. You’ll also want insulated gloves to protect yourself from electrical shocks.
Other handy items include:
- Service manualfor your snowmobile model—this provides specific resistance values and wiring diagrams.
- Cleaning supplieslike electrical contact cleaner and a soft brush to ensure good connections.
- Battery chargerto maintain proper voltage during testing if your snowmobile battery is low.
Think about how much easier it is to test with everything prepared and at your fingertips. What tools do you already have, and what might improve your next diagnostic session?
Preparing The Snowmobile
Preparing your snowmobile properly is key before testing the stator. It ensures safety and smooth access to the parts. A well-prepared machine avoids damage and saves time during inspection.
Safety Precautions
Disconnect the snowmobile’s battery to avoid electric shocks. Wear gloves to protect your hands from sharp edges. Use safety glasses to shield your eyes from dirt or debris. Work in a well-lit, dry area to prevent accidents. Avoid loose clothing that could catch on parts.
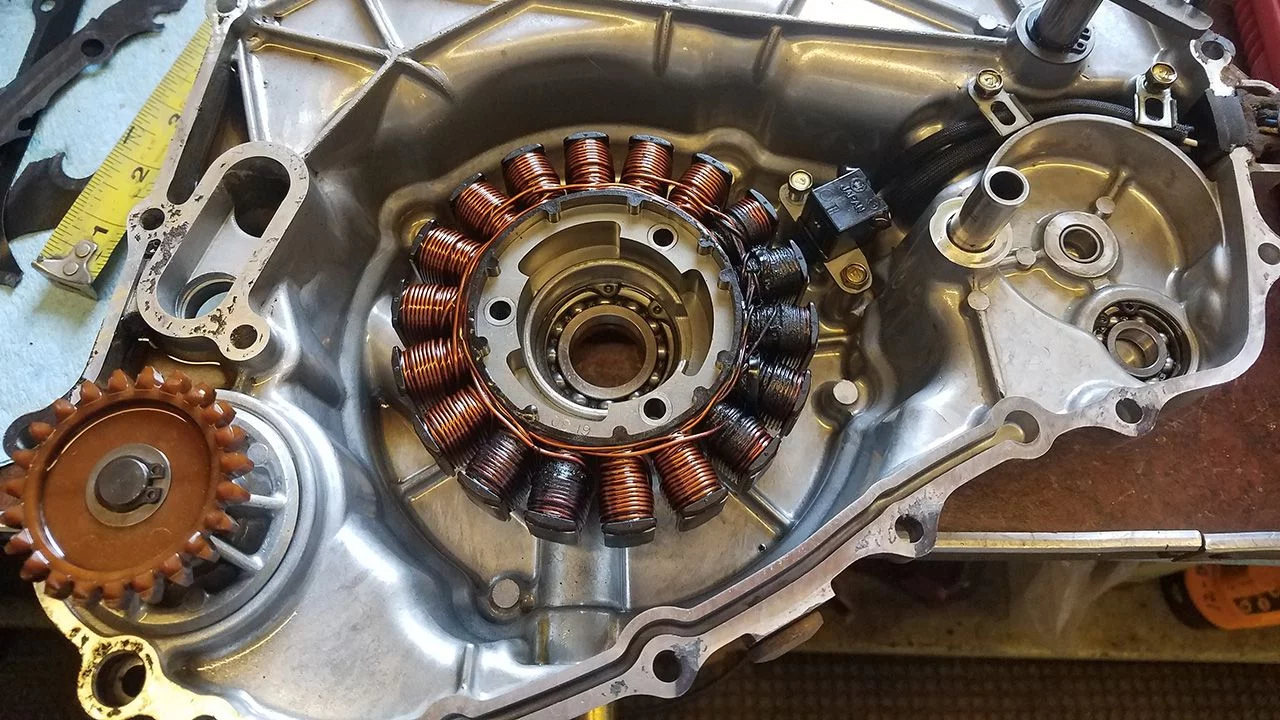
Accessing The Stator
Locate the stator, usually inside the engine casing. Remove the seat and fuel tank for better access if needed. Use the correct tools to remove engine covers carefully. Keep screws and bolts organized to avoid losing them. Clean the area around the stator to see connections clearly.
Conducting Resistance Tests
Conducting resistance tests on a snowmobile stator helps find electrical problems. These tests check the stator coils for breaks or shorts. Proper tools and careful steps can save time and money on repairs.
Testing Stator Coils
First, disconnect the stator from the snowmobile wiring. Use a digital multimeter set to the ohms (Ω) scale. Touch the meter probes to the coil terminals. Check between each coil wire and the stator’s metal frame as well.
- Measure resistance between coil wires.
- Measure resistance between coil wires and ground (metal frame).
Note the readings carefully. Low or zero resistance to ground means a short circuit. Infinite or very high resistance between coils shows a broken wire.
Interpreting Resistance Readings
Compare your readings with the manufacturer’s specs. Typical coil resistance is usually low but not zero. Ground resistance should show as infinite or open circuit.
| Reading | Meaning |
|---|---|
| Low resistance between coils | Coils are intact and connected properly |
| High or infinite resistance between coils | Broken or damaged coil wire |
| Low resistance to ground | Short circuit or damaged insulation |
| Infinite resistance to ground | Good insulation, no shorts |
Record your results for future reference. Replace the stator if readings fall outside normal ranges.
Performing Voltage Output Tests
Performing voltage output tests on your snowmobile stator is a crucial step to ensure it is generating the correct electrical power. This test checks the stator’s ability to produce alternating current (AC) voltage, which is essential for your snowmobile’s charging system. If the output is weak or inconsistent, it could indicate a faulty stator that needs replacement.
Setting Up The Multimeter
First, you need to prepare your multimeter for the voltage test. Set the multimeter to measure AC voltage (VAC) because the stator produces alternating current, not direct current. Make sure your multimeter leads are properly connected—red to the voltage input and black to the common terminal.
Before testing, check that your snowmobile’s battery is disconnected to avoid any electrical interference. Also, have your snowmobile’s service manual handy to know the expected voltage range for your specific model. This helps you compare your readings accurately.
Measuring Ac Voltage
Locate the stator connector, usually found near the engine or under the hood. With the engine running at a moderate speed, carefully touch the multimeter probes to the stator’s output wires. You should test between each pair of wires if there are three, as many stators have three-phase wiring.
- Read the voltage on the multimeter for each pair.
- Compare the readings against the manufacturer’s specifications, usually between 20 to 50 volts AC at 3000 RPM.
- Look for consistent readings across all pairs; large variations can mean a damaged stator coil.
If your readings are lower than expected or fluctuate wildly, the stator may be failing. Have you ever noticed your snowmobile’s lights dimming or the battery not charging? These symptoms often point to stator issues, which this voltage test can confirm.

Credit: www.youtube.com
Checking For Ground Faults
Checking for ground faults is essential when testing a snowmobile stator. A ground fault means electricity leaks to the metal parts instead of flowing correctly. This problem can cause the stator to fail or drain the battery quickly. Detecting ground faults early helps prevent bigger electrical issues and keeps the snowmobile running smoothly.
Testing For Shorts
Start by disconnecting the stator from the snowmobile wiring. Use a multimeter set to the resistance (ohms) mode. Touch one probe to the stator wire and the other to the stator frame or metal part. A reading close to zero means a short circuit exists. No reading or infinite resistance means no short. Repeat this test on all stator wires to check each coil.
Identifying Insulation Issues
Insulation protects the stator wires from touching the metal frame. Damaged insulation causes ground faults. Visually inspect the stator wires for cracks, burns, or wear. Use the multimeter’s continuity setting between each wire and the frame. Continuity indicates insulation failure. Fix or replace any damaged wiring to restore proper insulation and prevent shorts.
Common Troubleshooting Tips
Testing your snowmobile stator can sometimes lead to confusing results. Common troubleshooting tips help you make sense of these readings and decide the next steps. Understanding these tips will save you time and prevent unnecessary part replacements.
Addressing Inconsistent Readings
Inconsistent readings are a common headache when testing a stator. They can happen because of loose connections, dirty contacts, or even a faulty multimeter.
Start by double-checking all wire connections. Clean any corrosion or dirt from the connectors to ensure a solid electrical path.
Try testing the stator with a different multimeter if you suspect your tool might be the problem. Sometimes, a faulty meter gives false readings that can mislead you.
If your readings jump around, test the stator at different engine speeds. Fluctuations can indicate internal stator damage or wiring issues.
When To Replace The Stator
Knowing when to replace the stator is crucial to avoid leaving your snowmobile stranded. If your tests show open circuits or shorted coils, it’s a clear sign the stator is failing.
Look for physical damage like burnt spots, broken wires, or melted insulation. These are red flags that replacement is necessary.
Even if the stator passes basic tests but your snowmobile still struggles to charge the battery, consider the stator’s age and overall condition. Sometimes, replacement prevents bigger problems down the road.
Have you ever ignored a warning sign on your snowmobile’s electrical system only to face a breakdown later? Paying close attention during testing can help you avoid this common mistake.

Credit: www.youtube.com
Credit: finntrail.com
Frequently Asked Questions
How Do You Test A Snowmobile Stator?
To test a snowmobile stator, use a multimeter to check resistance and continuity. Measure the output voltage while the engine runs. Compare readings with manufacturer specs to confirm if the stator is functioning properly or needs replacement.
What Tools Are Needed To Test A Snowmobile Stator?
You need a digital multimeter, service manual, and basic hand tools. The multimeter measures resistance and voltage. The manual provides correct specifications. Basic tools help access the stator safely for testing and inspection.
What Are Common Signs Of A Faulty Snowmobile Stator?
Common signs include dim lights, battery not charging, engine stalling, and poor performance. These symptoms indicate the stator may not generate sufficient electrical power. Testing the stator confirms its condition and helps avoid further damage.
Can I Test A Snowmobile Stator Without Removing It?
Yes, you can test some stators without removal by measuring output voltage at connector leads. However, resistance testing usually requires stator removal. Always follow safety guidelines and consult the service manual for accurate testing procedures.
Conclusion
Testing your snowmobile stator helps keep your machine running well. Use a multimeter to check for proper resistance and continuity. Clean connections and tight wiring improve accuracy. Catching stator issues early saves time and money on repairs. Regular checks prevent unexpected breakdowns in cold weather.
Stay safe and enjoy your snowmobile rides without worry. Simple tests give you peace of mind and better performance. Keep your stator in good shape for smooth, reliable rides.

Automotive Specialist & Expert Writer
Tyler Kingston is a passionate automotive writer with a wealth of knowledge in all things cars. With years of experience in the automotive industry, Tyler specializes in everything from vehicle maintenance to the latest car technologies and innovations. He is known for his ability to break down complex automotive concepts into easily digestible, engaging content for both novice and experienced car enthusiasts. Whether it’s detailing car repair techniques, reviewing new car models, or diving into the world of auto accessories, Tyler’s articles provide valuable insights to readers. His hands-on experience, combined with a genuine love for cars, allows him to deliver expert advice, tips, and news that keeps readers coming back for more.