How to Replace Cabin Air Filter Mazda 3: Step-by-Step Guide
Have you ever noticed a lingering smell inside your Mazda 3 that just won’t go away? Or maybe your air conditioning doesn’t seem as effective as it once was?
If so, it might be time to replace your cabin air filter. This small component plays a big role in keeping the air inside your car fresh and clean, free from dust, pollen, and other unwanted particles. Replacing it is not only a simple task but also one that can significantly enhance your driving experience.
You’ll discover step-by-step instructions on how to replace the cabin air filter in your Mazda 3, ensuring you breathe easier and drive happier. Let’s get started, so you can enjoy a fresher ride today!
Tools And Materials Needed
Replacing the cabin air filter in your Mazda 3 is a straightforward task. You need the right tools and materials to get started. Having these items handy will make the process smooth and efficient.
Tools Required
First, gather a few basic tools. You’ll need a screwdriver. A flathead screwdriver works well for removing screws. Also, a pair of pliers can be useful. These help in pulling out the old filter.
Materials Needed
Next, focus on the materials. The most crucial item is the new cabin air filter. Ensure it’s the correct size for your Mazda 3. Check the packaging for compatibility details.
Workspace Preparation
Preparing your workspace is essential. Clear a spot near the car to place tools and materials. Lay down a cloth or mat. This prevents dirt from getting into the filter area.
Additional Supplies
It’s wise to have a flashlight. This helps you see inside the filter compartment. Also, keep a small container nearby. Use it to store screws safely.
Credit: revlimiter.net
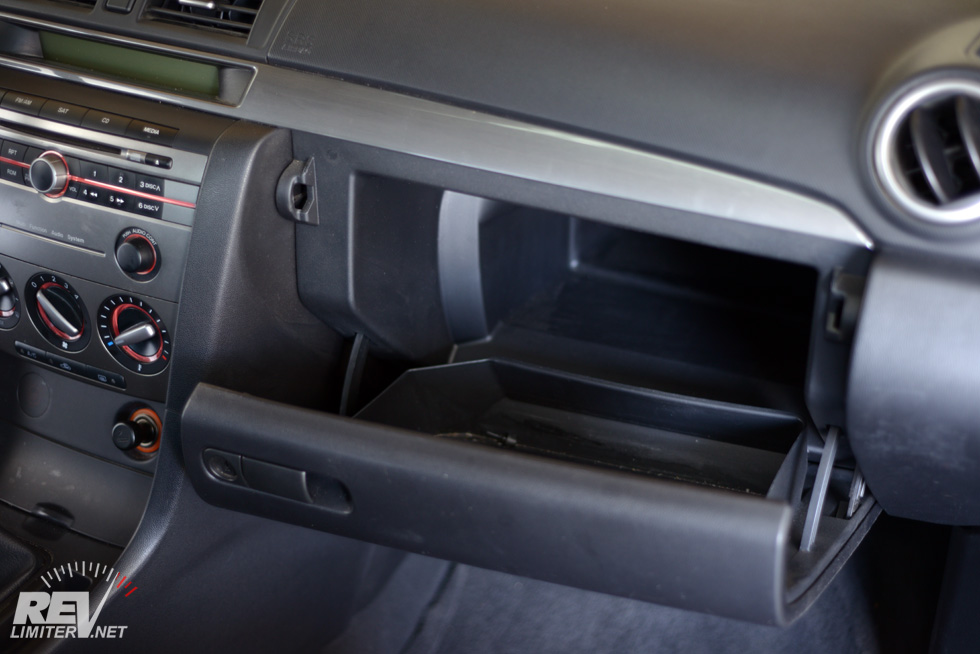
Locating The Cabin Air Filter
Discovering the cabin air filter in a Mazda 3 is easy. Typically found behind the glove box, it requires simple tools for replacement. Ensure clear air flow and optimal performance by changing it regularly.
Locating the cabin air filter in your Mazda 3 might seem like a daunting task at first, but with a little guidance, you’ll find it’s easier than you think. The cabin air filter is essential for maintaining clean air inside your vehicle, filtering out dust, pollen, and other airborne particles. Let’s walk through the steps to locate it, making your next DIY project a breeze.Understanding The Importance Of Location
Before diving in, recognize why finding the correct location is crucial. An improperly placed filter won’t perform effectively. This could lead to a musty smell or reduced airflow in your car, which nobody wants. By correctly locating the filter, you ensure optimal performance and a fresh-smelling interior.Check The Glove Box
In most Mazda 3 models, the cabin air filter is accessible through the glove box. Open it up and remove any items inside. Look for the tabs or screws that secure the glove box to the dashboard. Once you spot them, gently remove the glove box to reveal the filter compartment.Look For The Filter Cover
Behind the glove box, you’ll notice a rectangular cover. This cover houses the cabin air filter. It’s usually secured with clips or screws. Carefully remove this cover, ensuring you don’t lose any small parts. What’s the condition of the filter? If it’s dirty, replacement is necessary.Inspect The Filter Area
With the cover off, take a moment to inspect the filter area. Is it dusty or filled with debris? Cleaning this area ensures the new filter operates at its best. Use a soft cloth or vacuum to clear out any dirt you find.Consider Accessibility
Some might wonder if all Mazda 3 models have the cabin air filter in the same spot. While the glove box is a common location, it’s wise to check your owner’s manual for specific instructions. Have you ever tried finding something without a map? The manual serves as your guide to avoid unnecessary frustration.Personal Insight
I remember the first time I tackled this task, I felt a bit overwhelmed. But as I took each step slowly, it became a straightforward process. Don’t rush, and you’ll handle it like a pro. Are you ready to take on the challenge? With these steps, you’ve got the foundation to locate your Mazda 3’s cabin air filter confidently.Removing The Glove Compartment
To replace the cabin air filter in a Mazda 3, first remove the glove compartment. This step provides access to the filter housing. Carefully follow instructions to ensure a smooth replacement process.
Replacing the cabin air filter in your Mazda 3 is a simple task that can greatly improve the air quality inside your vehicle. One of the essential steps in this process is removing the glove compartment. This might sound a bit intimidating at first, but with the right guidance and tools, you can do it easily and efficiently. Let’s explore the process, ensuring you have a smooth experience.Safety Precautions
Before you dive into removing the glove compartment, it’s crucial to prioritize safety. Ensure your car is parked on a level surface and the engine is off. This prevents any unexpected movements or accidents. Keep all your tools organized and within reach to avoid any unnecessary distractions. Remember to wear gloves if you have sensitive skin, as the components might have some dust or sharp edges.Step-by-step Removal
1. Empty the Glove Compartment Open the glove compartment and remove all its contents. You don’t want your belongings tumbling out during the process. 2. Locate the Stops Find the stops on each side of the glove compartment. These stops prevent the compartment from falling out completely when opened. 3. Release the Stops Gently press on the sides of the glove compartment to bypass the stops. This action allows the compartment to swing down further, giving you access to the air filter housing. 4. Detach the Compartment Carefully pull the glove compartment off its hinges. It should come out with minimal effort. Place it safely aside to avoid any damage. 5. Access the Air Filter Housing With the glove compartment removed, you can now see and access the cabin air filter housing. It’s time for the next step in the replacement process. Have you ever thought about how often you should replace your cabin air filter? Regular maintenance not only ensures a fresher interior but can also enhance your car’s performance. Knowing how to remove the glove compartment efficiently is a skill that saves time and keeps you one step ahead in maintaining your Mazda 3.Accessing The Cabin Air Filter
Replacing the cabin air filter in your Mazda 3 is crucial for clean air. It helps maintain the air quality inside the car. Accessing the cabin air filter is the first step in this process. Follow these steps to locate and open the filter compartment easily.
Identifying The Filter Housing
Locate the filter housing under the glove box. It’s usually behind a panel. This area is often secured with screws or clips. Check the owner’s manual for the exact location. Look for rectangular shapes or markings indicating the filter housing. Ensure you have the right tools to access it.
Opening The Filter Compartment
Remove any screws or clips holding the panel. Use a screwdriver if necessary. Carefully detach the panel to reveal the filter compartment. Pull open the compartment door gently. Take note of how the filter is positioned. This helps when installing the new one. Keep the area clean while working.
Removing The Old Cabin Air Filter
Replacing the cabin air filter in your Mazda 3 is a straightforward task that can significantly enhance your driving experience. As you embark on this DIY project, the first crucial step is removing the old cabin air filter. Proper removal not only ensures a smooth replacement process but also safeguards your car’s interior from potential dust and debris. So, let’s get hands-on and tackle this step with precision and care.
Proper Handling Of The Old Filter
When you remove the old cabin air filter, handle it gently. Filters are delicate and can easily tear, leading to a mess of dust particles. Hold it firmly but with care, and be mindful of any residual debris it might carry.
Have you ever noticed how some tasks feel more like a chore than others? Removing the cabin air filter can be quick and painless, especially if you pay attention to how you handle it. Would you rather spend time cleaning up a mess or enjoy a smooth filter change?
Disposal Tips
Once you’ve removed the filter, it’s important to dispose of it correctly. Simply tossing it in the trash might seem like a quick solution, but consider recycling options. Many auto parts stores offer recycling programs for used filters.
Think about the environment while you work on your car. Proper disposal not only helps keep your workspace tidy but also supports environmental conservation. Have you considered how small actions contribute to a larger cause?
Ultimately, removing the old cabin air filter is a simple yet significant step in maintaining your Mazda 3. With careful handling and responsible disposal, you’re setting the stage for a fresh start—both for your vehicle and the environment. Now, are you ready to breathe cleaner air?

Credit: www.ifixit.com
Installing The New Cabin Air Filter
Replacing the cabin air filter in a Mazda 3 improves air quality inside the vehicle. Start by locating the filter behind the glove box and gently remove the old filter. Insert the new filter, ensuring it fits snugly, to enjoy clean air during drives.
Installing the new cabin air filter in your Mazda 3 is essential. A clean filter ensures fresh air inside your car. It also helps in maintaining air quality. Follow these simple steps to install the filter yourself.Correct Orientation And Placement
Begin by identifying the airflow direction. Most filters have an arrow indicating airflow. Make sure the arrow points the right way. This ensures the filter works effectively. Incorrect placement can reduce performance. Gently slide the new filter into the slot. Ensure it fits snugly without forcing it. A proper fit prevents gaps where unfiltered air can pass.Securing The Filter
Once the filter is correctly placed, check the surrounding area. Ensure no debris remains inside the compartment. Close the filter housing cover securely. This prevents the filter from shifting during use. Double-check that the cover is locked. A loose cover might cause rattling noises. It can also allow unfiltered air to enter. Finally, test your air system. Turn it on to ensure everything functions properly. Enjoy a fresher and cleaner air experience in your Mazda 3.Reassembling The Glove Compartment
After replacing the cabin air filter in your Mazda 3, the next step is reassembling the glove compartment. This part is crucial to ensure everything fits back perfectly. Reattaching the glove compartment can seem tricky, but with a few simple steps, it becomes manageable. Let’s walk through the process to make your car feel complete again.
Steps To Reattach
Begin by aligning the glove compartment with its original position. Check that the hinges are visible and accessible. Hold the compartment steady while securing one hinge at a time. Use a screwdriver to tighten the screws, ensuring they’re firm but not overtightened. Repeat this process for both hinges.
Next, reconnect the damper arm to the glove compartment. This small rod helps the compartment open and close smoothly. Simply snap it back into place. Be gentle to avoid damaging any components.
Ensuring Proper Fit
Once reattached, test the glove compartment by opening and closing it. It should move smoothly without any resistance. Check the alignment by inspecting the edges. They should sit flush with the dashboard.
If the compartment feels loose, revisit the screws. Tighten them slightly until the fit improves. Ensure nothing obstructs the glove compartment from closing properly.
Finally, make sure all personal items are back inside. Confirm everything is as it was before the filter replacement. A properly reassembled glove compartment ensures your Mazda 3 looks and feels just right.

Credit: www.youcanic.com
Testing The Installation
After replacing the cabin air filter in your Mazda 3, it’s time to test the installation. This step ensures your car’s air system works efficiently. Proper testing can help you identify any issues early. Follow these simple checks to confirm your new filter is functioning correctly.
Checking Airflow
Start your car and turn on the air conditioning. Set it to the highest setting. Feel the air coming from the vents. Is the airflow strong and consistent? A strong flow indicates the filter is installed correctly. Weak airflow may suggest a problem. Double-check the filter’s position. Ensure it’s seated properly in its housing.
Verifying Filter Function
Notice the air quality inside your vehicle. Is it fresh and clean? A new filter should improve the air quality. Look for dust or debris around the vents. Clean air means the filter is doing its job. If you notice particles or smells, recheck the filter installation. Ensure it’s the right model for your Mazda 3.
Maintenance Tips
Regular maintenance ensures your Mazda 3 runs smoothly. The cabin air filter is crucial. It keeps the air inside fresh and clean. A clean filter improves air quality and prevents allergens. Follow these tips to keep your filter in top condition.
When To Replace Again
Replacing your cabin air filter at the right time is key. Check your owner’s manual for recommendations. Typically, replace it every 12,000 to 15,000 miles. Driving in dusty areas may require more frequent changes. Keeping track helps maintain air quality.
Signs Of A Clogged Filter
A clogged filter shows noticeable signs. Reduced airflow from vents is a common symptom. Musty odors inside the car indicate a problem. Increased noise from the fan also suggests a clogged filter. Pay attention to these signs for timely replacements.
Frequently Asked Questions
How Often Should I Change The Cabin Filter On My Mazda 3?
Change the cabin filter on your Mazda 3 every 15,000 to 20,000 miles. Check your owner’s manual for specifics. Regular replacement ensures clean air and optimizes HVAC performance. Consider climate and driving conditions for more accurate intervals. A clean filter enhances comfort and protects against allergens.
Can I Replace My Cabin Air Filter Myself?
Yes, you can replace your cabin air filter yourself. Follow your vehicle’s manual for guidance. Ensure you use the correct filter type. Regular replacement improves air quality and system efficiency.
How Much Does It Cost To Replace A Cabin Air Filter On A Mazda 3?
Replacing a cabin air filter on a Mazda 3 typically costs between $30 and $60. Prices can vary based on location and whether you choose a dealership or an independent shop. DIY replacement can save labor costs, as the filter itself usually costs around $15 to $25.
What Are The Symptoms Of A Dirty Cabin Filter?
A dirty cabin filter causes reduced airflow, bad odors, foggy windows, and increased dust inside the vehicle. It can also lead to poor air quality and strain the HVAC system, affecting its performance. Regularly replacing the filter helps maintain a clean and healthy cabin environment.
Conclusion
Replacing the cabin air filter in your Mazda 3 is simple. This task improves air quality and ensures a clean cabin. Regular maintenance keeps your car running smoothly. Always use the correct filter type for best results. Follow the steps carefully, and you’ll complete it quickly.
A clean filter means fresh air on every drive. Your Mazda 3 deserves proper care. Keep up with regular checks and enjoy a healthier ride. Happy driving with a cleaner, fresher cabin!

Automotive Specialist & Expert Mechanic
Noah Brooks is a skilled automotive expert with a passion for both the technical and creative aspects of the automotive world. With years of experience in repairing, restoring, and enhancing vehicles, Noah is known for his deep knowledge of car mechanics, parts, and accessories. His expertise extends to welding, troubleshooting, and offering advice on the latest car technologies and trends. Whether it’s diagnosing complex issues or guiding readers through DIY car repairs, Noah’s blog posts are filled with hands-on insights that appeal to both novice and experienced car enthusiasts. When he’s not writing, Noah is working on his own car projects, continually learning and sharing his automotive passion with the world.