How to Replace Honda Accord Cabin Air Filter: Easy Guide
Are you noticing a musty smell in your Honda Accord or feeling that the airflow isn’t quite right? These could be signs that it’s time to replace your cabin air filter.
Taking care of your car’s cabin air filter not only ensures fresh air but also helps in maintaining a pleasant driving experience. It’s an easy process that you can tackle yourself, saving time and money. In this guide, you’ll discover simple steps on how to replace the cabin air filter in your Honda Accord without breaking a sweat.
Stick around, and you’ll soon breathe easier knowing that you’ve taken a step toward a cleaner and more efficient car interior.

Credit: www.youtube.com
Tools And Materials Needed
Gather a new cabin air filter, screwdriver, and gloves. These basic tools ensure a smooth replacement process. Keep the workspace tidy and organized for efficiency.
Changing the cabin air filter in your Honda Accord is a simple task that can greatly improve your car’s air quality. You’ll need the right tools and materials to ensure a smooth process. Knowing what to gather beforehand can save you time and make the replacement easier. Whether you’re a seasoned DIY enthusiast or a first-timer, preparing your tools and materials is a crucial step.
Tools Needed
To start, you’ll need a few basic tools. A Phillips screwdriver is essential for removing screws that hold the glove compartment in place. A flathead screwdriver can also be helpful for prying open tight spots. Having a flashlight on hand is advisable. It can help you see better inside the dashboard. It’s amazing how a simple tool like a flashlight can make a difference in making sure you don’t miss any screws or clips.
Materials Needed
The most important material is the cabin air filter itself. Ensure you purchase one compatible with your Honda Accord model year. Filters are usually labeled with the car’s make, model, and year, which makes it easy to find the correct one. Consider purchasing a filter with activated carbon. These filters are excellent for removing odors and pollutants, enhancing the air quality inside your car. It’s a small investment that can make a big difference in your driving experience.
Safety Considerations
Before you begin, think about safety. Wearing gloves can protect your hands from dirt and sharp edges. Eye protection is also a good idea, especially if you’re working in a cramped space. Ensure your car is parked on a flat surface and the engine is off. This may sound obvious, but it’s crucial for your safety. You might be surprised at how these basic precautions can prevent mishaps. Are you ready to gather your tools and materials? Preparing in advance can make the task straightforward and hassle-free. What’s stopping you from taking the plunge? Get ready to breathe cleaner air in your Honda Accord.
Locating The Cabin Air Filter
Discovering the cabin air filter location in a Honda Accord is simple. It’s usually behind the glove compartment. Remove the glove compartment to access and replace the filter easily.
Locating the cabin air filter in a Honda Accord is straightforward. Knowing its position helps in efficiently replacing it. This guide will provide step-by-step instructions. Let’s make this task simple and quick.
Step 1: Identify The Glove Compartment
The glove compartment holds the key to accessing the filter. Open it fully by pulling the handle. Ensure your car is parked on a level surface. This prevents any accidental mishaps while working.
Step 2: Clear Out The Glove Compartment
Remove all items from the glove compartment. This makes it easier to work without obstruction. Avoid leaving any loose items inside. They may fall out during the process.
Step 3: Locate The Side Retaining Arm
Look for a small arm on the side of the glove compartment. This arm helps in controlling the glove box movement. Gently unhook it to release the compartment further.
Step 4: Remove The Glove Compartment Stops
Find the stops on either side of the glove compartment. Press them inward to allow the compartment to drop down. This gives you a clear view of the cabin air filter cover.
Step 5: Find The Cabin Air Filter Cover
Behind the lowered glove compartment, locate a rectangular cover. This cover protects the cabin air filter. It is usually held in place with clips or a latch. By following these steps, locating the cabin air filter becomes effortless. Each step prepares you for the replacement process.
Accessing The Glove Compartment
Accessing the glove compartment of your Honda Accord is the first step in replacing the cabin air filter. This might seem daunting, but it’s simpler than you think. You’ve probably opened that compartment countless times, but this time, you’re diving deeper. You’re not just grabbing a gum pack or your car registration—you’re about to unearth the gateway to cleaner air.
Emptying The Glove Compartment
Start by clearing out your glove compartment. Yes, that means taking out the sunglasses you rarely wear and the random receipts. It’s like preparing a workspace; you need a clear area to operate effectively. As you clear it, consider which items you actually need in there. Could be a chance to declutter!
Removing The Stopper Arm
Once empty, you’ll notice a stopper arm on the side of the compartment. This tiny piece is crucial, as it prevents the glove box from swinging open too far. Gently push it and slide it off its hook. It’s like playing with a puzzle—once you get it, it feels rewarding. A little patience here goes a long way.
Detaching The Glove Box
With the stopper arm removed, it’s time to detach the glove box. Press in on the sides to release it from its holding clips. It may require a bit of force, but don’t worry—it’s designed to give way. Think of this moment as the reveal in a magic trick. You’re about to uncover the cabin air filter, the hidden hero of your car’s air quality.
Doesn’t it feel empowering to take control of your car’s maintenance? Accessing the glove compartment is just the beginning. You’re not only saving money but also ensuring a fresher driving experience. Now, what other car maintenance tasks could you tackle?
Removing The Old Air Filter
Replacing the cabin air filter in your Honda Accord is simple. Start by removing the old air filter. This process ensures your car’s air remains clean and fresh. A clean air filter improves air quality inside the car. Follow these steps to remove the old filter properly.
Opening The Filter Cover
The filter cover is usually in the glove box. Begin by opening the glove box carefully. You might need to remove a few screws. Once open, locate the filter cover. Press the tabs on the sides of the cover. This will release the filter cover from its place. Gently pull the cover away to reveal the filter.
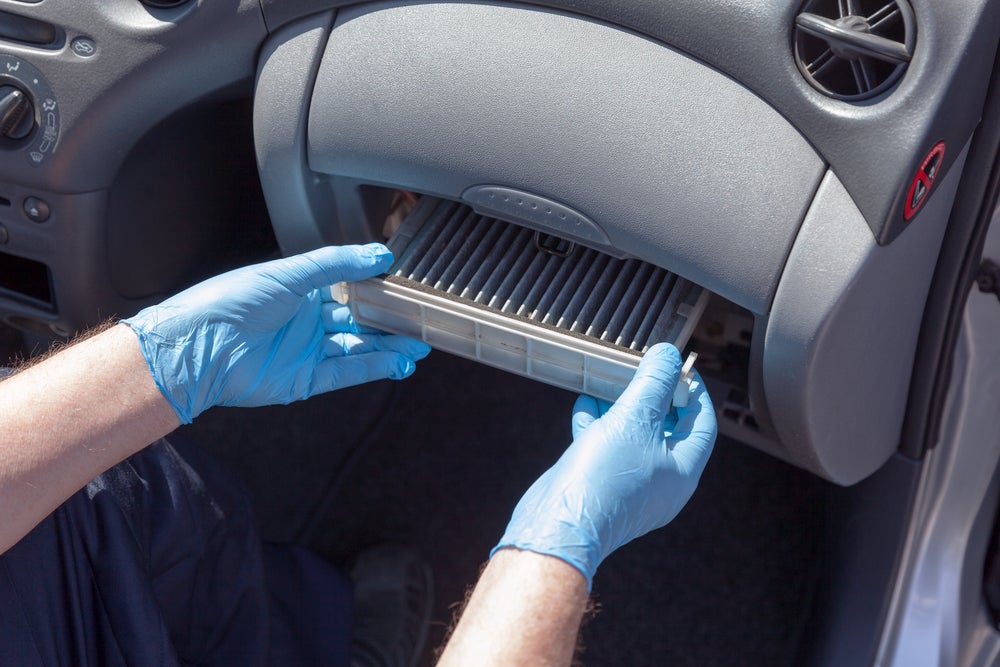
Extracting The Filter
With the cover off, you can see the old filter. The filter slides out easily. Gently pull it towards you. Check the filter’s condition. If it’s dirty, it’s time for a replacement. Avoid touching the debris with your hands. Dispose of the old filter properly. Now, your car is ready for a new air filter.
Installing The New Air Filter
Installing the new cabin air filter in your Honda Accord is simple. Follow these steps to ensure proper installation and maintain air quality. A fresh filter keeps your car’s interior clean and smelling fresh. It also improves airflow, making your drive more comfortable.
Placing The New Filter
Start by locating the filter compartment. This is usually behind the glove box. Carefully remove the old filter. Check the direction of the airflow arrows on the new filter. Insert the new filter, ensuring it faces the correct direction. Align it properly within the compartment. This ensures optimal performance.
Securing The Filter Cover
Once the new filter is in place, secure the filter cover. Make sure it fits tightly to avoid any air leaks. This helps maintain the efficiency of your air system. Ensure all screws or clips are tightened properly. This prevents the cover from coming loose while driving. Confirm that the cover is secure by gently tugging at it.
Credit: www.gunnhonda.com
Reassembling The Glove Compartment
Changing the cabin air filter in a Honda Accord involves reassembling the glove compartment. Start by removing the old filter from its housing. Slide the new filter into place, ensuring it fits snugly.
Reassembling the glove compartment of your Honda Accord is the final step in replacing the cabin air filter. It might seem like a minor task, but it ensures everything is back in place and ready for your next drive. This part of the process is quick and straightforward if you follow the steps carefully.
Reattaching The Glove Box
First, align the glove box with its original position. Hold it up to the dashboard and gently push the hinges into their slots. You should hear a satisfying click when they lock in place. Have you ever struggled with a glove box that wouldn’t close properly? Avoid that by making sure the hinges are correctly aligned before pressing them in.
Reconnecting The Stopper Arm
Next, locate the stopper arm on the side of the glove box. Slide it back into the small hole from which it was detached. This small, often overlooked piece is crucial for the smooth operation of your glove box. Have you ever wondered why your glove compartment door drops suddenly? A properly connected stopper arm prevents that from happening, ensuring a controlled, gentle open each time.
Restocking The Glove Compartment
Now, it’s time to put everything back where it belongs. Take this opportunity to organize your items. Keep essential documents like your car registration and insurance at the top for easy access. Do you find your glove compartment cluttered? Consider using small organizers or envelopes to keep things tidy and easy to find. Reassembling your glove compartment not only completes the air filter replacement but also gives you a fresh start with an organized space. Is there anything more satisfying than a job well done and a clutter-free glove box?
Tips For Maintenance
Regular maintenance of your Honda Accord cabin air filter ensures a clean airflow inside your vehicle. A clean filter prevents dust and allergens from entering the cabin. This not only keeps the air fresh but also enhances the efficiency of your car’s air conditioning system. Follow these simple tips to maintain your cabin air filter effectively.
Check The Filter Regularly
Inspect the cabin air filter every 12,000 miles or once a year. Frequent checks can prevent unwanted build-up. Dust and dirt accumulate faster in certain environments. Adjust your schedule based on your driving conditions.
Know The Signs Of A Dirty Filter
Notice any unusual odors or reduced airflow inside your car? These are signs of a dirty filter. A clogged filter can strain your air conditioning system. Replace it promptly to maintain comfort and efficiency.
Choose The Right Filter
Not all filters are the same. Make sure to select a filter that fits your Honda Accord model. Check your owner’s manual for specifications. A perfect fit ensures optimal performance.
Keep The Surroundings Clean
Keep the area around the filter clean. Regularly vacuum your car’s interior. This reduces the amount of dust reaching the filter. A clean car supports a longer filter life.
Replace The Filter Yourself
Replacing the cabin air filter is a straightforward task. Save money by doing it yourself. Follow step-by-step guides available online. Enjoy the satisfaction of maintaining your car.

Credit: www.youtube.com
Troubleshooting Common Issues
Replacing the cabin air filter in your Honda Accord can sometimes lead to issues. Understanding these common problems helps you troubleshoot effectively. Let’s explore some potential challenges you might face.
Filter Doesn’t Fit Properly
Check the filter size. Ensure it matches the old one. Incorrect size causes installation issues. Always verify the part number before buying.
Unpleasant Odors Persist
Bad smells might linger even after replacing the filter. Clean the filter housing thoroughly. Use a disinfectant spray to eliminate odors.
Reduced Airflow
Airflow might not improve after installation. Inspect the filter for blockages. Ensure it’s installed the right way. Double-check the airflow direction indicated on the filter.
Difficulty Accessing Filter
Accessing the filter can be tricky. Refer to your car’s manual for guidance. Follow step-by-step instructions to locate the filter compartment.
Noise From Vents
Replacing the filter might cause strange noises. Ensure the filter is secured properly. Loose filters can vibrate and create noise.
Frequently Asked Questions
How Do I Change The Cabin Filter In A Honda Accord?
Locate the cabin filter behind the glove box. Remove the glove box by releasing its tabs. Pull out the old filter, insert the new one, and secure the glove box back. Ensure the filter is properly seated. Regular replacement ensures optimal air quality in your Honda Accord.
How Often Should You Change The Cabin Air Filter On A Honda Accord?
Change the cabin air filter on a Honda Accord every 15,000 to 30,000 miles. Check your owner’s manual for specifics. Regular replacement ensures clean air and prevents pollen, dust, and debris from entering your vehicle. Maintaining your air filter improves air quality and keeps your Honda running efficiently.
Can A Dirty Cabin Filter Affect Ac?
Yes, a dirty cabin filter can affect AC performance. It restricts airflow, reduces cooling efficiency, and may cause unpleasant odors. Regularly replacing the cabin filter ensures optimal AC function and improves air quality inside the vehicle. Check your vehicle’s manual for recommended replacement intervals.
Can I Replace My Cabin Air Filter Myself?
Yes, you can replace your cabin air filter yourself. It’s a simple task with basic tools. Check your car’s manual for instructions and recommended replacement intervals. Regularly changing the filter improves air quality and HVAC performance. Save money by doing it at home.
Conclusion
Replacing a Honda Accord cabin air filter is simple and quick. Regular maintenance ensures fresh air inside your car. A clean filter improves air quality and keeps you healthy. Follow the steps carefully to avoid mistakes. Use the correct filter size for best results.
Regularly check your filter for dust and debris. Changing it every 12,000 miles is a good rule. Keep your car’s interior comfortable and clean. Enjoy a fresher driving experience. Save time and money by doing it yourself. Your Honda Accord will thank you!
Why is My Car Hesitating to Accelerate: Top Causes

Automotive Specialist & Expert Mechanic
Noah Brooks is a skilled automotive expert with a passion for both the technical and creative aspects of the automotive world. With years of experience in repairing, restoring, and enhancing vehicles, Noah is known for his deep knowledge of car mechanics, parts, and accessories. His expertise extends to welding, troubleshooting, and offering advice on the latest car technologies and trends. Whether it’s diagnosing complex issues or guiding readers through DIY car repairs, Noah’s blog posts are filled with hands-on insights that appeal to both novice and experienced car enthusiasts. When he’s not writing, Noah is working on his own car projects, continually learning and sharing his automotive passion with the world.