How to Press in a Ball Joint: Easy Steps for Perfect Installation
If you’ve ever worked on your car’s suspension, you know how tricky ball joints can be. Pressing them in correctly is key to keeping your vehicle safe and running smoothly.
But how do you make sure you’re doing it right without damaging parts or wasting time? In this guide, you’ll discover simple, step-by-step instructions to press in a ball joint like a pro. Whether you’re a beginner or just want to sharpen your skills, this article will give you the confidence and know-how to get the job done efficiently.
Keep reading to learn the secrets that mechanics use to tackle ball joints with ease!

Credit: www.reddit.com
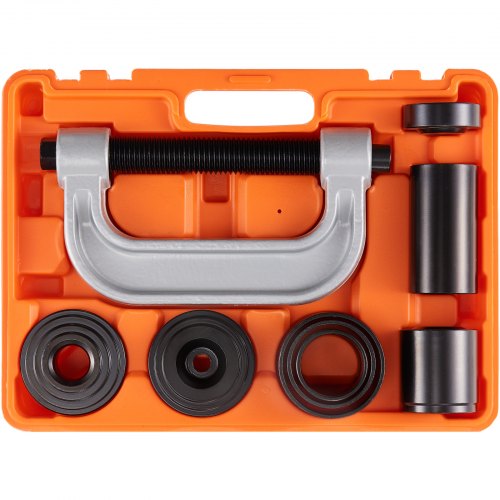
Tools Needed
Pressing in a ball joint requires the right set of tools to make the job efficient and safe. Having the correct equipment not only saves time but also prevents damage to your vehicle’s suspension parts. Before you start, ensure you have everything you need at hand to avoid interruptions.
Essential Equipment
To press a ball joint successfully, you’ll need a quality ball joint press kit. These kits usually include C-clamps, adapters, and cups designed to fit different ball joint sizes. A heavy-duty socket set can help remove and install retaining bolts with ease.
Don’t forget a breaker bar or a torque wrench to apply the right amount of force without stripping bolts. A hammer and punch may be necessary to loosen stubborn joints before pressing them out. Having a bench vise can make holding parts steady much easier during the process.
Safety Gear
Your safety should be a top priority while working on ball joints. Always wear safety glasses to protect your eyes from flying debris or grease. Gloves will protect your hands from sharp edges and provide a better grip on tools.
Consider wearing long sleeves and sturdy shoes to avoid cuts and injuries. Using ear protection might be useful if you’re working in a noisy garage or using impact tools. Have a first aid kit nearby just in case you need it.
Preparing The Vehicle
Ensure the vehicle is parked on a flat surface and the parking brake is set. Lift the vehicle safely using a jack and secure it with jack stands before starting work. Remove the wheel and clean the area around the ball joint for easy access.
Preparing the vehicle is crucial before pressing in a ball joint. It ensures safety and efficiency throughout the process. Proper preparation prevents accidents and equipment damage.
Lifting And Securing
Begin by parking on a flat surface. Engage the parking brake. Use a jack to lift the vehicle. Place it under the manufacturer’s recommended lifting points. Once lifted, secure the vehicle with jack stands. Confirm they are stable before proceeding. This step is vital for your safety.
Removing The Wheel
Use a wrench to loosen the lug nuts. Do this before fully lifting the vehicle. Once the car is lifted and secured, remove the lug nuts entirely. Carefully take off the wheel and set it aside. This exposes the area where you will work. Ensure you have clear access to the ball joint.
Removing The Old Ball Joint
Removing the old ball joint is a crucial part of the repair process. It requires careful handling to avoid damaging surrounding parts. Taking your time here ensures the new ball joint fits perfectly and functions smoothly.
Disconnecting Components
Start by loosening the wheel lug nuts and safely lifting your vehicle. Remove the wheel to access the suspension. You’ll need to disconnect parts like the control arm and tie rod end to free the ball joint.
Use a wrench or socket set to unbolt these components. Sometimes, the ball joint stud is secured with a cotter pin or a castle nut—make sure to remove these carefully. Have a ball joint separator or pickle fork ready to pry the joint loose without harming the control arm.
Ask yourself: Have you double-checked all connections before applying force? Skipping this can lead to stripped bolts or bent parts, complicating the removal even more.
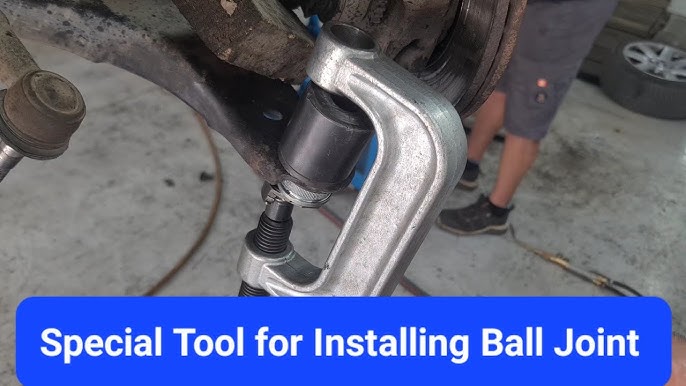
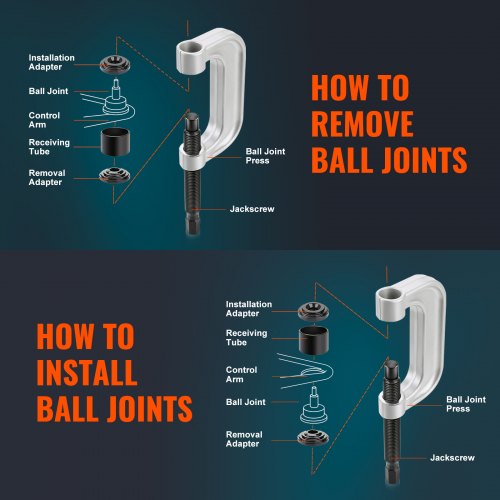
Using A Ball Joint Press
A ball joint press is designed to push the old ball joint out cleanly. Position the press so that it aligns perfectly with the joint to avoid damage. Slowly tighten the press to press the ball joint out of the control arm.
This process might take some strength, but rushing it can bend or break the arm. If the ball joint is stuck, spraying some penetrating oil and letting it sit can help. Remember, patience here saves you from costly mistakes later.
Have you prepared a workspace to catch any falling parts? Keeping everything organized will make installing the new ball joint much easier.
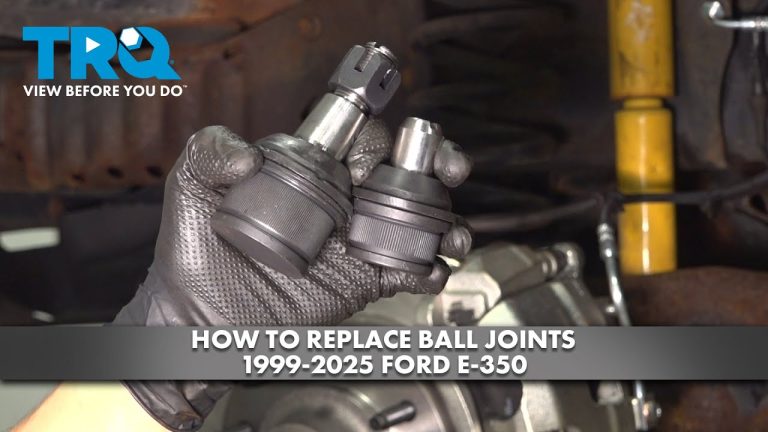
Installing The New Ball Joint
Installing the new ball joint requires care and precision. Proper installation ensures the joint works smoothly and lasts longer. The process starts with aligning the ball joint correctly. Then, use the press to fit it securely into place. Each step matters to avoid damage or poor performance.
Aligning The Ball Joint
Place the new ball joint near the control arm hole. Check the ball joint’s orientation matches the original part. The stud should point in the correct direction for easy connection. Ensure the joint sits flush against the arm. Misalignment can cause uneven wear or failure.
Using The Press Correctly
Choose the right press adapters for your ball joint size. Center the ball joint on the control arm hole. Apply steady pressure using the press. Avoid sudden force that may damage the joint. Press until the ball joint is fully seated. Double-check the fit before moving on.
Reassembling The Suspension
Reassembling the suspension after pressing in a new ball joint is a critical step that ensures your vehicle’s handling and safety. Skipping details or rushing through this phase can lead to poor alignment, uneven tire wear, or even dangerous driving conditions. Paying close attention to how each part fits back together will save you time and money in the long run.
Reattaching Components
Start by carefully positioning the control arm back into place. You want to make sure the ball joint stud lines up perfectly with the steering knuckle. Don’t force parts together; if they don’t fit smoothly, check for misalignment or leftover debris.
Secure all bolts and nuts by hand before tightening. This approach prevents stripping threads or cross-threading, which can cause bigger headaches later. Remember to reconnect any sensors or brake lines you might have disconnected during disassembly.
Torque Specifications
Using a torque wrench is essential here. Each bolt has a specific torque value that ensures it’s tight enough to hold but not so tight that it damages the threads or components.
| Component | Torque Specification (ft-lbs) |
|---|---|
| Ball Joint Nut | 70 – 90 |
| Control Arm Bolts | 80 – 110 |
| Steering Knuckle Bolts | 65 – 85 |
Are you double-checking your torque settings? Many mechanics overlook this, but it’s the difference between a safe repair and a premature failure. Always refer to your vehicle’s manual for exact numbers.
Testing The Installation
Testing the installation of a ball joint is crucial to ensure your vehicle’s safety and performance. Even if the pressing process went smoothly, the real proof lies in how the joint behaves once installed. Taking the time to check for play and perform a road test can save you from costly repairs down the line.
Checking For Play
After pressing in the ball joint, you need to verify there’s no unwanted movement. Grab the wheel at the 12 and 6 o’clock positions and try to rock it back and forth. Any noticeable play could indicate the ball joint isn’t seated properly or is defective.
Next, use a pry bar between the control arm and steering knuckle to gently test for looseness. If you feel any movement, don’t ignore it. A tight, stable joint is essential for safe handling and even tire wear.
Road Test Tips
Once you’ve confirmed the ball joint sits firmly, take your vehicle for a short drive. Pay attention to unusual noises like clunking or squeaking, especially when turning or going over bumps. These sounds often hint at installation issues or joint failure.
Observe how the steering feels—does it respond smoothly or feel loose? Also, test braking stability; a bad ball joint can cause pulling or vibration during stops. If something feels off, it’s better to recheck the installation immediately than risk driving unsafe.
Common Issues And Fixes
Pressing a ball joint can be tricky, and you might face a few common problems along the way. Recognizing these issues early helps you avoid costly mistakes and ensures your vehicle runs smoothly. Let’s talk about the usual hurdles and how you can fix them effectively.
Pressing Difficulties
One common challenge is the ball joint not pressing in evenly. This happens when the press tool isn’t aligned correctly, causing the joint to go in at an angle. You want to keep the tool straight and apply steady, even pressure to prevent damage.
If the ball joint feels stuck, it might be due to rust or debris in the housing. Cleaning the area thoroughly before pressing can save you a lot of frustration. Sometimes, applying a bit of penetrating oil helps loosen stubborn parts.
Using the wrong size adapters or cups can also create problems. Make sure you have the right tools that fit snugly around the ball joint. This avoids bending or breaking parts during the pressing process.
Signs Of Improper Installation
How can you tell if a ball joint wasn’t installed correctly? One clear sign is uneven wear on the tires, which often points to misalignment caused by a faulty ball joint. If you notice your vehicle pulling to one side, that’s another red flag.
Listen for unusual noises like clunking or squeaking when turning or going over bumps. These sounds often mean the ball joint is loose or not seated properly. Don’t ignore these noises—they’re your vehicle’s way of asking for attention.
Another warning sign is excessive play in the steering or suspension. You can test this by lifting the wheel and shaking it gently. If it moves more than it should, the ball joint might be installed incorrectly or worn out.
Have you ever pressed a ball joint and felt unsure if it was done right? Checking for these signs early can save you from bigger repairs down the road.
Credit: www.vevor.ca
Credit: www.vevor.ca
Frequently Asked Questions
What Tools Are Needed To Press In A Ball Joint?
You need a ball joint press kit, wrenches, sockets, and a hammer. A hydraulic press helps with stubborn joints. Proper tools ensure safe, efficient removal and installation.
How Do You Safely Press Out A Ball Joint?
Secure the control arm in the press. Align the press tool with the ball joint. Apply steady pressure to avoid damage. Wear safety glasses and gloves during the process.
Can I Press In A Ball Joint Without A Press Tool?
It’s not recommended. Using improper tools can damage the joint or suspension parts. A ball joint press kit provides the correct force and alignment for safe installation.
How Long Does It Take To Press In A Ball Joint?
Typically, pressing in a ball joint takes about 30 to 60 minutes. Time depends on your experience and the vehicle model. Proper preparation speeds up the process.
Conclusion
Pressing in a ball joint takes patience and care. Use the right tools to avoid damage. Work slowly and check your progress often. Keep safety in mind to protect yourself. Doing it right helps your vehicle run smoothly. Practice will make the process easier next time.
Stay calm and follow each step carefully. This way, you ensure a strong and lasting repair.

Automotive Specialist & Expert Writer
Tyler Kingston is a passionate automotive writer with a wealth of knowledge in all things cars. With years of experience in the automotive industry, Tyler specializes in everything from vehicle maintenance to the latest car technologies and innovations. He is known for his ability to break down complex automotive concepts into easily digestible, engaging content for both novice and experienced car enthusiasts. Whether it’s detailing car repair techniques, reviewing new car models, or diving into the world of auto accessories, Tyler’s articles provide valuable insights to readers. His hands-on experience, combined with a genuine love for cars, allows him to deliver expert advice, tips, and news that keeps readers coming back for more.