How to Clean My Headlights With Toothpaste: Easy DIY Guide
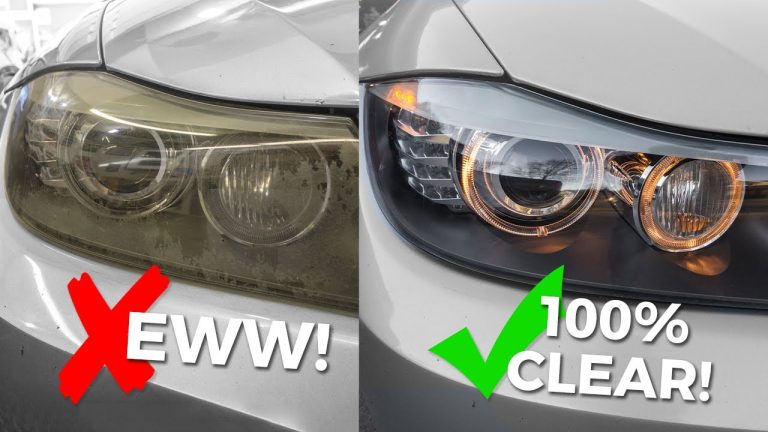
Have you noticed that your car’s headlights aren’t as bright as they used to be? Maybe they have become cloudy or yellowed over time.
This can be frustrating, especially if you’re driving at night or in poor weather conditions. But before you consider expensive professional cleaning services or buying new headlights, there’s a simple trick you can try right at home — using toothpaste.
Yes, toothpaste! You might be surprised to learn that the same product you use to keep your teeth clean and shiny can also work wonders on your headlights. Not only is it cost-effective, but it’s also quick and easy to do. Imagine regaining that crystal-clear shine in just a few simple steps. You deserve to drive safely and confidently, and clean headlights are a crucial part of that experience. Stick around to discover how this everyday bathroom staple can transform your car’s appearance, improve your safety, and even boost your confidence behind the wheel.
Credit: www.carhop.com
Materials Needed
Cleaning your headlights with toothpaste is a simple process. You need only a few materials to get started. These items are often found at home, making the task convenient. Let’s explore what you’ll need to make your headlights shine.
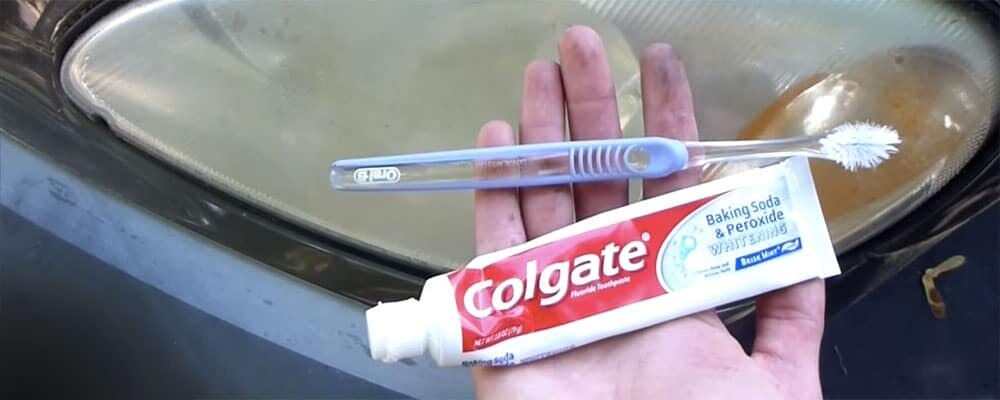
1. Toothpaste
Choose a non-gel toothpaste. It should have mild abrasives. This helps remove grime from the headlights.
2. Soft Cloth
A soft cloth is essential. It prevents scratches on the plastic lens. Microfiber cloths work best.
3. Water
Water is crucial for rinsing the headlights. It helps remove the toothpaste and dirt residue.
4. Bucket
A small bucket holds the water needed for rinsing. It makes the process easier and more organized.
5. Masking Tape
Use masking tape to protect the car’s paint. It keeps the toothpaste from spreading to unwanted areas.
6. Sponge Or Brush
A sponge or brush helps apply the toothpaste. It ensures even coverage across the headlight surface.

Credit: www.wikihow.com
Preparing Your Vehicle
To clean your headlights, apply toothpaste to a soft cloth. Gently rub in circular motions to remove dirt. Rinse with water and wipe dry for clear, bright headlights.
Cleaning your headlights with toothpaste might sound surprising, but it’s an effective DIY method that can restore clarity without breaking the bank. Before you dive in, it’s crucial to prepare your vehicle properly. This ensures the process is smooth and successful. Let’s explore how you can get your car ready for this easy yet efficient cleaning hack.
Check The Weather Conditions
Before starting, it’s important to choose the right day. A sunny or overcast day is ideal. Avoid rainy days as moisture can interfere with the cleaning process. Also, direct sunlight can cause the toothpaste to dry too quickly, making it harder to wipe off.
Gather Your Materials
Have all your materials handy. You’ll need toothpaste (non-gel), a soft cloth, and water. You might also want to grab a spray bottle for the water to make rinsing easier. This way, you won’t have to search for anything mid-process.
Park Your Vehicle On A Level Surface
Park your car on a flat surface. This ensures you have easy access to the headlights and prevents any accidental movements. A garage or driveway is perfect for this. Make sure the car is turned off and the keys are safely stored.
Clean The Surrounding Areas
Before you apply toothpaste, clean the area around the headlights. Use a damp cloth to wipe off dust and dirt. This prevents debris from mixing with the toothpaste, which could cause scratches.
Consider Safety Precautions
Safety first! Ensure you’re not working in an area with heavy traffic. Wear gloves if you have sensitive skin. Toothpaste can be mildly abrasive, so it’s better to protect your hands.
Reflect On Your Experience
Remember the last DIY task you tackled? Did you feel accomplished? Preparing your vehicle is just the first step. Imagine the satisfaction of seeing sparkling headlights. It’s not just about cleaning; it’s about taking pride in your work. Are you ready to see your headlights shine like new? Prepare your vehicle with care, and the outcome will surely surprise you!
Cleaning Process
The cleaning process for headlights using toothpaste is simple and effective. It restores clarity to dull and foggy headlights. Toothpaste has mild abrasives that help remove grime and oxidation. This method is affordable and uses household items. Follow these steps to bring back the shine to your headlights.
Applying Toothpaste
Start by cleaning the headlights with soap and water. This removes surface dirt. Dry them with a clean cloth. Squeeze a generous amount of toothpaste onto a soft cloth or sponge. Use a toothpaste that contains baking soda. It enhances the cleaning effect.
Scrubbing The Headlights
Rub the toothpaste onto the headlight in small, circular motions. Apply gentle pressure to cover the entire surface. Focus on areas with heavy oxidation or dirt. Continue scrubbing for about five minutes. The abrasive action of the toothpaste helps remove the haze.
Rinsing And Drying
Rinse the headlights thoroughly with water. Ensure all toothpaste residue is removed. Use a clean, soft cloth to dry the headlights completely. Inspect them for any remaining spots. Repeat the process if necessary for stubborn areas.
Additional Tips
Cleaning headlights with toothpaste is simple. But you need to know a few extra tips. These tips ensure your headlights stay clean and bright longer.
Choosing The Right Toothpaste
Not all toothpaste works well for headlights. Choose a non-gel toothpaste. It should have mild abrasives to scrub away dirt. Whitening toothpaste works well. It often contains baking soda. Baking soda helps polish and remove stains.
Frequency Of Cleaning
Headlights can get dirty fast. Clean them every few months. This keeps them clear and bright. If you drive often, clean them more. Dirt from roads and rain can build up quickly.
Protecting Your Headlights
After cleaning, protect your headlights. Use a UV sealant. It blocks harmful sun rays. Sun can make headlights yellow over time. A sealant also keeps dirt away longer. Wax can also help protect headlights. Apply a thin layer after cleaning. It adds shine and protection.
Troubleshooting Common Issues
Cleaning headlights with toothpaste is simple. But sometimes, issues arise. This guide will help you address these problems. Let’s explore common challenges and their solutions.
Persistent Cloudiness
If your headlights remain cloudy, don’t worry. The toothpaste may not have been strong enough. Try using a different brand. Some brands have more abrasives. These can work better on tough stains. Ensure you rub thoroughly during cleaning. Use a circular motion to cover all areas. If cloudiness persists, repeat the process. This can help remove stubborn dirt and grime.
Scratches And Damages
Toothpaste can clean, but it might not fix scratches. Check the surface after cleaning. If scratches remain, consider other solutions. You might need a polishing compound. These products can fill minor scratches. For deeper damages, professional help may be required. Regular cleaning prevents further damage. Avoid harsh materials during cleaning. These can cause new scratches.

Credit: www.youtube.com
Benefits Of Diy Headlight Cleaning
Cleaning your headlights with toothpaste offers a simple, effective DIY solution. It can make a big difference in visibility and safety. Instead of spending money on professional services, use items you already have at home. This method saves time and money while providing impressive results.
Cost Savings
Professional headlight cleaning can be expensive. DIY methods with toothpaste reduce costs significantly. You only need a tube of toothpaste and a cloth. This method is budget-friendly and efficient.
Convenience
DIY cleaning means no trips to the auto shop. It allows you to clean your headlights at any time. This adds a level of convenience to maintaining your vehicle.
Environmental Impact
Using toothpaste for cleaning is eco-friendly. It reduces the need for chemical cleaners. You are using a product already in your home.
Immediate Results
Toothpaste cleaning offers quick results. You see improvement in minutes. Your headlights look clearer and brighter right away.
Enhanced Safety
Clear headlights improve night driving safety. They ensure better visibility on the road. DIY cleaning enhances your driving experience.
Frequently Asked Questions
Does Cleaning Headlights With Toothpaste Really Work?
Yes, toothpaste can effectively clean headlights temporarily. It removes oxidation and improves clarity. Apply with a cloth, rub, and rinse. For longer-lasting results, consider professional cleaning or restoration kits. Regular maintenance ensures better visibility and safety while driving.
How Do You Clean Cloudy Headlights?
Clean cloudy headlights using toothpaste and a soft cloth. Apply toothpaste, scrub gently, and rinse with water.
How Long Do You Let Toothpaste Sit On Your Headlights?
Let toothpaste sit on your headlights for about 5-10 minutes. Gently scrub with a soft cloth, then rinse thoroughly with water. This helps remove grime and restore clarity to the headlights, improving visibility. Regular cleaning can maintain headlight brightness and enhance your vehicle’s appearance.
What Toothpaste Is Best For Polishing Headlights?
Use white toothpaste containing baking soda for polishing headlights. It gently removes grime and enhances clarity. Avoid gel types, as they lack abrasive properties. Apply with a soft cloth, then rinse thoroughly. Regular use maintains visibility and appearance. Ensure headlights are completely dry after cleaning for optimal results.
Conclusion
Toothpaste is a simple solution for cleaning headlights. It’s affordable and effective. With just a few steps, your headlights can shine bright again. No need for expensive cleaners or professional help. Regular cleaning keeps your headlights clear and safe. Remember to use a soft cloth and gentle pressure.
Consistency is key for lasting results. A little effort goes a long way in maintaining your car’s appearance. Give it a try and see the difference. Your headlights will thank you. Clean headlights improve visibility and safety on the road.
Keep your car looking its best with this easy method.

Automotive Specialist & Expert Mechanic
Noah Brooks is a skilled automotive expert with a passion for both the technical and creative aspects of the automotive world. With years of experience in repairing, restoring, and enhancing vehicles, Noah is known for his deep knowledge of car mechanics, parts, and accessories. His expertise extends to welding, troubleshooting, and offering advice on the latest car technologies and trends. Whether it’s diagnosing complex issues or guiding readers through DIY car repairs, Noah’s blog posts are filled with hands-on insights that appeal to both novice and experienced car enthusiasts. When he’s not writing, Noah is working on his own car projects, continually learning and sharing his automotive passion with the world.