How to Adjust Pressure Switch on Well Pump: DIY Guide
If your well pump isn’t working quite right, the pressure switch might be the reason. Knowing how to adjust the pressure switch on your well pump can save you time, money, and frustration.
You don’t need to be an expert or call a professional every time you notice a problem. You’ll learn simple, step-by-step instructions to fix your pump’s pressure settings quickly and safely. Keep reading to take control of your water system and avoid costly repairs down the line.

Credit: rcworst.com
Signs Of Pressure Switch Issues
Recognizing the signs of pressure switch issues early can save you from costly repairs and inconvenient water outages. Your well pump’s pressure switch controls when the pump turns on and off, keeping your water pressure steady. If it starts acting up, you’ll notice changes that affect your water supply and pump performance.
Common Symptoms
Watch out for these clear signs that your pressure switch might be failing:
- Rapid cycling:The pump turns on and off frequently within short periods, which strains the motor.
- Inconsistent water pressure:Water flow fluctuates unexpectedly or feels weak even when the pump runs.
- Pump won’t start:The switch fails to activate the pump, leaving you without water.
- Pump runs continuously:The switch doesn’t shut off the pump, causing it to run nonstop and potentially overheat.
- Visible corrosion or damage:Dirt, rust, or worn contacts on the switch may disrupt its function.
These symptoms often appear gradually. Have you noticed your water pressure dipping or your pump sounding different lately? Ignoring these signs can lead to bigger issues down the line.
When To Check The Switch
You should inspect your pressure switch if you experience any unusual pump behavior or pressure changes. It’s wise to check after you’ve done routine maintenance or if the water supply suddenly becomes unreliable.
For example, if your pump cycles on and off rapidly, it’s time to look at the switch contacts. Similarly, if the pump runs non-stop, the switch might be stuck or the pressure settings could be off.
Don’t wait for a complete failure. Regularly testing the switch can help you catch problems early. Have you scheduled your last pump and switch check? Staying proactive saves time and money.

Credit: rcworst.com
Tools And Safety Gear Needed
Basic tools like a screwdriver and wrench are essential for adjusting the pressure switch. Safety gear such as gloves and eye protection helps prevent injuries during the process. Always turn off the power before starting any work on the well pump.
When adjusting the pressure switch on a well pump, using the right tools and safety gear is crucial. Proper preparation ensures a smoother process and minimizes risks. Here’s what you’ll need to have on hand before getting started.Essential Tools
- Screwdriver: A flat-head screwdriver is typically required.
- Wrench: An adjustable wrench helps in loosening tight connections.
- Voltage Tester: Ensures the pump is not live before adjustments.
- Pressure Gauge: Measures the pressure settings accurately.
- Flashlight: Useful for better visibility in dimly lit areas.
Safety Precautions
- Turn off Power: Always switch off the power supply first.
- Wear Gloves: Protects hands from sharp edges and electric hazards.
- Eye Protection: Safety goggles prevent debris from entering the eyes.
- Dry Surface: Ensure the work area is dry to avoid slips or shocks.
- Read Manual: Familiarize yourself with the pump’s manual for guidance.
Locating The Pressure Switch
Locating the pressure switch is the first step to adjust your well pump. This small device controls when the pump turns on and off. Finding it helps you understand the system better and make precise adjustments.
The pressure switch is usually near the pressure tank or the pump itself. Knowing its position saves time and avoids confusion. You can then proceed safely with any changes or maintenance.
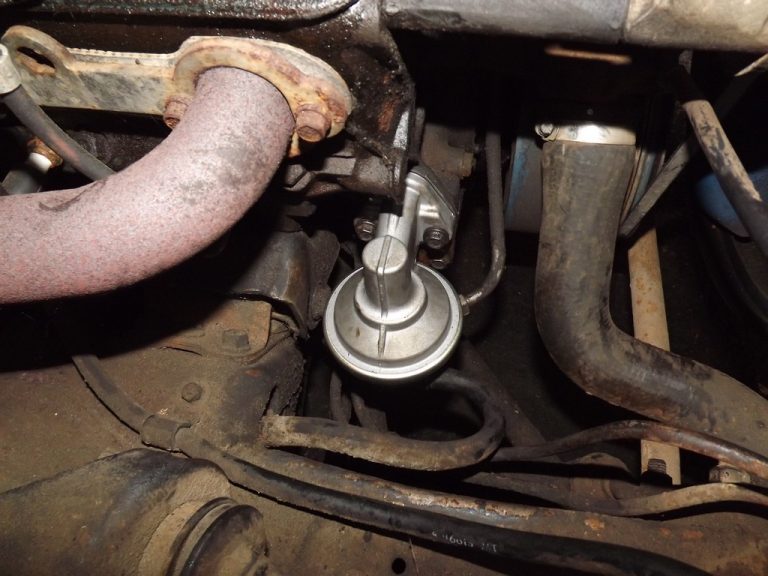
Identifying The Switch
The pressure switch looks like a small metal box attached to the pipe. It often has a cover that you can remove to see the internal parts. The switch connects to electrical wires and the water pipe.
Common signs of the pressure switch include:
- A rectangular or square shape
- Two or more electrical wires leading into it
- A pipe connection on the bottom or side
- A label showing pressure ranges, like 20-40 psi
Accessing The Unit
Accessing the pressure switch may require clearing the area around the pump. Remove any panels or covers gently. Make sure the power is off before touching any parts.
Use a flashlight if the space is dark. Wear gloves to protect your hands from dirt or sharp edges. Keep tools nearby for removing screws or bolts.
Reading The Pressure Settings
Reading the pressure settings on your well pump’s pressure switch is essential for maintaining a steady water supply and avoiding unnecessary wear on your system. Knowing exactly what the numbers mean can help you adjust the switch correctly and prevent issues like short cycling or low water pressure.
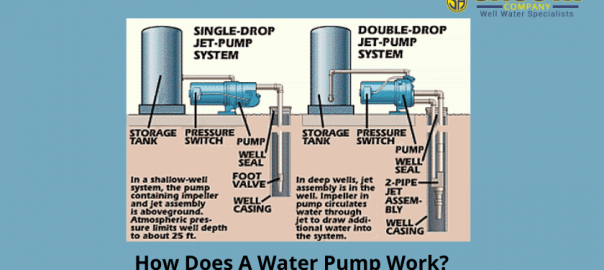
Pressure Range Basics
The pressure switch controls when your pump turns on and off by monitoring water pressure in the system. Typically, well pumps operate within a pressure range measured in pounds per square inch (PSI). Understanding this range helps you keep your pump running efficiently.
Most pressure switches have a default range, often around 30 to 50 PSI. The lower number is the pressure at which the pump turns on, and the higher number is when it turns off. You can find these numbers stamped on the pressure switch cover or inside the switch itself.
Think about your own water needs. Do you want stronger water pressure for showers or irrigation? Adjusting within the range can make a big difference. But remember, pushing the pressure too high can damage your system.
Understanding Cut-in And Cut-out
The terms “cut-in” and “cut-out” describe the pressure points where the pump starts and stops. The cut-in pressure is the minimum pressure that triggers the pump to turn on and start filling your system.
The cut-out pressure is the maximum pressure that causes the pump to stop running. If these settings are too close, your pump may cycle on and off too frequently, which can shorten its lifespan.
Imagine you notice your pump turning on every few minutes. This could mean your cut-in and cut-out pressures are set too narrowly. Adjusting these settings can give your pump longer breaks and reduce electricity use.
Adjusting The Pressure Switch
Adjusting the pressure switch on your well pump is a straightforward task that can improve your water system’s efficiency and prevent frequent cycling. Getting the settings right ensures your pump runs smoothly and protects the system from damage. Let’s break down the key steps to adjust the pressure switch correctly.
Loosening The Cover
Start by turning off the power to your well pump for safety. The pressure switch is usually covered by a metal or plastic cover that protects the internal components.
Use a screwdriver to carefully loosen the screws holding the cover in place. Removing the cover exposes the adjustment nuts and springs inside. Keep the screws safe—you’ll need them to put the cover back on.
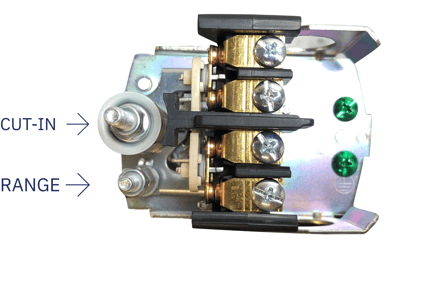
Turning The Adjustment Nuts
Inside the pressure switch, you will find two adjustment nuts mounted on a bracket. One nut controls the cut-in pressure (when the pump turns on), and the other controls the cut-out pressure (when the pump turns off).
Turn the nuts slowly in small increments. Turning clockwise generally increases pressure settings, while counterclockwise lowers them. Be cautious—tiny turns can make a big difference in pump behavior.
Setting Desired Pressure
Before adjusting, note the current pressure settings using a pressure gauge attached to the system. Decide on the ideal cut-in and cut-out pressures based on your household water needs.
Adjust the nuts until the gauge shows your desired pressure range. After setting, replace the cover, restore power, and test the pump’s operation. Does the pump start and stop at the right pressures? If not, fine-tune the nuts again.
Testing The New Settings
Testing the new settings on your well pump pressure switch is key to ensuring proper function and system safety. This process confirms that the pump turns on and off at the correct pressure levels. Careful observation helps detect any issues before they cause damage or reduce water supply efficiency.
Restarting The Pump
First, restore power to the pump system. Watch the pump as it starts running. Listen for any unusual sounds, such as grinding or clicking. These could indicate mechanical problems or incorrect switch settings. Ensure the pump activates smoothly without delay.
Next, check the pressure gauge. The pump should start when pressure falls below the cut-in level set on the switch. Note the pressure reading at this point. This confirms the switch triggers at the desired lower limit.
Monitoring Pressure Changes
Allow the pump to run and increase pressure. Observe the gauge closely. The pump should stop once it reaches the cut-out pressure setting. Record this upper pressure level to verify accuracy.
Keep an eye on the pressure for several cycles. The pressure should stay stable between the cut-in and cut-out points. Watch for rapid cycling or pressure drops, which may signal switch or tank problems.
If pressure does not match the new settings, repeat the adjustment process. Testing ensures your well pump operates efficiently and protects the system from damage.
Troubleshooting Common Problems
Troubleshooting pressure switch problems on a well pump saves time and money. Knowing common issues helps fix the pump quickly. Simple checks can identify many problems before calling a professional. Here are key problems and easy ways to handle them.
Switch Does Not Respond
A pressure switch that does not respond may have electrical or mechanical faults. Check if power reaches the switch using a voltage tester. Loose wires or corroded contacts can stop the switch from working. Clean contacts gently with sandpaper if corroded. Replace wires if damaged or loose.
Inspect the switch’s spring and diaphragm. These parts wear out over time. If damaged, the switch won’t trigger the pump. Replace the switch if mechanical parts seem broken.
Pressure Fluctuations
Pressure fluctuations cause water flow to be inconsistent. This often means the pressure switch settings are wrong. Check the cut-in and cut-out pressure settings on the switch. Adjust these settings using the nuts on the switch spring. Turn clockwise to increase pressure and counterclockwise to decrease.
Also, check the pressure tank’s air charge. Low air pressure causes uneven water pressure. Use a tire gauge to test tank pressure. Add air with an air compressor if needed. Proper pressure in the tank keeps water flow steady.
Pump Cycling Issues
Rapid cycling means the pump turns on and off too quickly. This shortens pump life and wastes energy. The cause is usually a small or waterlogged pressure tank. Tap the tank to check for water inside. A waterlogged tank needs draining or replacing.
Adjust the pressure switch to widen the cut-in and cut-out gap. This reduces cycling frequency. Also, check for leaks in pipes or fittings. Leaks cause the pump to run more often to maintain pressure.

Credit: rcworst.com
When To Call A Professional
Knowing when to call a professional is crucial for well pump maintenance. Adjusting a pressure switch may seem simple but can hide risks and complications. Certain situations require expert help to avoid damage and ensure safety.
Complex Repairs
Pressure switches involve delicate electrical parts. Malfunctions beyond basic adjustment need expert attention. If the pump keeps cycling or water pressure is unstable, a professional can diagnose deeper issues. Complex wiring problems or faulty components require special tools and knowledge.
Safety Concerns
Working with electrical systems poses risks. Incorrect handling can cause shocks or short circuits. Professionals follow safety standards and use proper gear. If you notice sparks, burning smells, or exposed wires, stop immediately and call an expert. Protect your home and family by trusting trained technicians.
Frequently Asked Questions
How Do I Know When To Adjust My Well Pump Pressure Switch?
You should adjust the pressure switch if your pump runs too frequently or pressure fluctuates. Check for short cycling or inconsistent water pressure. These signs indicate the switch settings need fine-tuning to protect the pump and ensure steady water flow.
What Tools Are Needed To Adjust A Pressure Switch?
You need a flathead screwdriver, adjustable wrench, and possibly needle-nose pliers. These tools help you safely open the switch cover and turn the adjustment nuts to set the correct pressure. Always turn off power before starting adjustments.
How Do I Safely Adjust The Pressure Switch On My Pump?
Turn off the power to the pump at the breaker. Remove the switch cover carefully, then turn the adjustment nuts slightly clockwise or counterclockwise. Replace the cover and restore power. Test the pump to confirm the new pressure settings are working correctly.
What Pressure Settings Are Ideal For A Well Pump Switch?
Typical settings are 30-50 psi (pressure cut-in and cut-out). Cut-in is when the pump starts, and cut-out is when it stops. Adjust according to your household needs and well capacity, ensuring the pump doesn’t run too often or cause pressure drops.
Conclusion
Adjusting the pressure switch on your well pump helps keep water flow steady. Small changes make a big difference in pump performance. Always check the pressure after adjustments to avoid problems. Take your time and follow safety steps carefully. Regular maintenance can extend your pump’s life and save money.
Now, you can handle simple pressure switch fixes at home. Feel confident to keep your water system running smoothly.

Colin Radner is an automotive enthusiast with a deep passion for cars and welding. With over five years of hands-on experience in welding, Colin brings a unique perspective to the automotive world. His expertise in welding, combined with his love for all things car-related, allows him to write insightful and informative blog posts that resonate with automotive lovers and DIY mechanics alike. When he’s not writing, you can find him working on car repairs, restoring vintage models, or exploring the latest trends in the automotive industry. Colin’s dedication to the craft and his ability to break down complex topics makes him a trusted voice in the automotive blogosphere.